How To Get Started With Renewable Energy
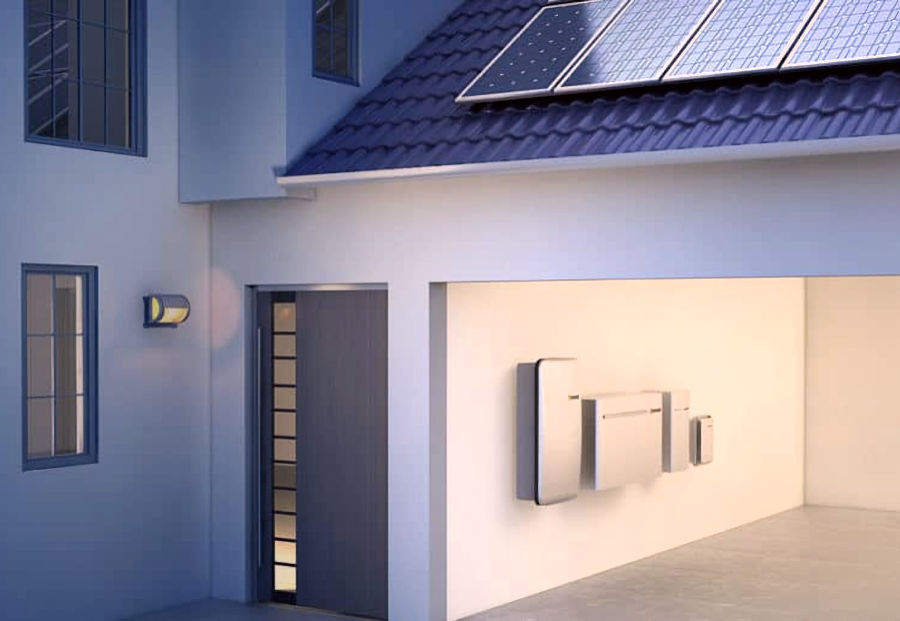
I get asked for advice about solar panels and battery storage so often, I thought I might as well write a guide. It is aimed at everyone, whether you are technical or not. I make no assumptions about your understanding of solar panels or batteries and I have tried to avoid talking about technology as much as possible. Where I can't avoid talking about it, I have tried to explain it simply.
I started my research into renewable energy in 2021. It really is a minefield, with many things that you need to know and many questions that you need to ask. My own journey and my smart home solar installation project only really started moving forward in October 2022, when my solar panels were installed. I consider my renewable energy projects an extension of my smart home work, which I have been doing for over 25 years. The two things are incredibly complementary and both meet my key objective of improving our quality of life.
In this guide I cover:
- Energy Needs - know what you use and plan ahead.
- Solar panels - how many, what to expect, what to look out for.
- Battery storage of electricity
- Monitoring and control.
- Energy tariffs
- Related reading - other stuff I have written that may be helpful.
Hopefully this guide will empower you with knowledge and allow you to ask all the right questions of any potential installer. Do not be afraid to ask questions and make sure you get acceptable answers that you fully understand. I plan to update this article with my research on wind turbines later.
Energy Needs
The simplest way to reduce your energy costs is to reduce your energy usage and I have also written an article on how to save energy. I am assuming you know the difference between a kW and a kWh. Read this section on terminology if you don't.
Before you start installing expensive equipment to generate energy, it really is a good idea to understand your current usage in terms of:
- How much you are using?
- What you are using it for?
- When you are using it?
The 'when' part becomes really important with variable rate tariffs, which have a set period (a 'window') of cheap electricity and it is much more expensive outside of this window. An understanding of your energy usage allows you to confidently predict the potential savings and to have a better understanding of what you are getting for your money.
It is also a really good idea to understand what other things you could use your generated energy for and to then plan how you might want use it going forward. As an example, if you are planning an electric vehicle (EV) (they are the future of motoring after all), this will change your energy usage dramatically and should change the design of your solar installation.

The best way to understand how much energy you currently use is to look at the billing data provided by your energy provider. Some are better at this than others. Many provide a smartphone app or a website where you can look at your historical usage. This should provide a 'baseline' monthly energy usage, against which you can compare future usage and measure any improvements.
Looking at meter readings is the simplest way to understand your energy usage. As a very minimum, you should be recording your meter readings at the start of each month. This will give you a good indication of how your energy usage varies throughout the year and what your annual usage is. Your energy provider bills should show your annual energy usage. As an example, the figures for our 4-bedroom, detached house built in 1995, with 4 adults in it are:
- In 2020 our annual usage was: Electricity 5,313kWh and Gas 19,066kWh. In 2020 we paid £790.43 for electricity and £480.85 for gas.
- In 2021 our annual usage was: Electricity 5,117kWh and Gas 16,962kWh. In 2021 we paid £955.86 for electricity and £581.57 for gas.
Your potential solar installer should provide a quotation showing how much energy the proposed installation will generate and a view of how this varies over the year. The quotation should also detail how much of the generated energy you would use (with and without battery storage if you asked for a battery) and how much of it will be exported back into the power network.
Solar Panels
When installing solar panels on your roof, there are some fixed costs such as the scaffolding, approvals, paperwork and testing. These will be roughly the same regardless of how many solar panels are installed. The solar panels are relatively cheap, so the more you install, the more cost effective they become and the better your Return On Investment (ROI) will be.
My view is that if you are going to fit solar panels, then you should fit as many as possible to your roof, because the biggest gains come from not just simply replacing your existing electricity usage with solar energy. You will get a much better Return On Investment (ROI) by replacing as much of your energy usage as possible (home appliances, space heating, water heating, transport, etc.) with solar energy.
The peak output of a solar panel array will be the number of panels × the peak output of each panel. As an example: 14 panels rated at 415W each will provide 14 × 415 = 5,810W or 5.81kW peak output in ideal conditions. It is possible to predict the monthly energy generation for any solar installation, configuration and location, using a tool such as the European Union PVGIS service. This is basically the same tool that your installer will use to provide your quotation estimates.
Solar panels turn solar energy into electricity and generate a dc voltage, much like a battery does. To get any useful power output from them, they need to be in direct sunlight. They will produce some power through mist and clouds but it will be at a much lower level. They will not produce anything once the sun has set. This means you are at the mercy of the the weather and there will be times when your solar panels produce little power for several days in a row. This is why it is really hard to become self-sufficient in energy in the UK and live in an off grid home.
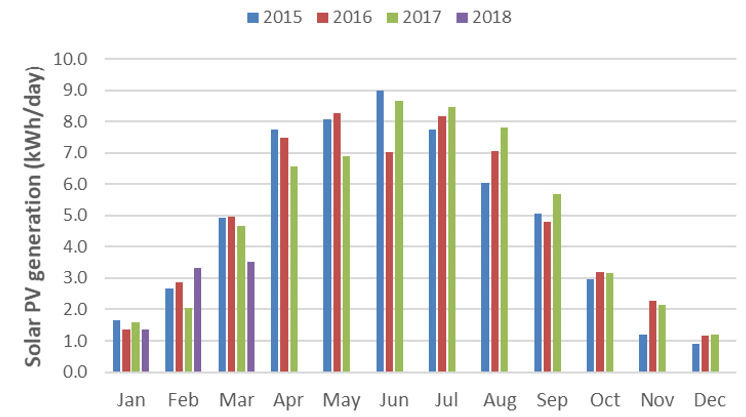
The amount of energy generated varies with the seasons because the sun is lower during the winter months and the days are shorter. This graph shows a typical monthly generation profile. Over winter, when you need the most energy for heating, solar panels produce their lowest output. 🙁 It is important that your expectations are realistic!
This variation over the year simply means:
- In the summer you will generate more energy than you can use. There are many ways to try and use it all but, it is inevitable that some of it will be exported back into the power network. You can get paid for exported energy and if you plan for this, you can dramatically improve your Return On Investment (ROI).
- In the winter you will not generate enough energy for all your needs. You will need to import more energy. If you plan for this and use battery storage, you can minimise what you pay for this imported energy.
In the early days of solar generation in the UK, there was a 'Feed In Tariff' (FIT) payments scheme for exported energy. This was replaced by a new scheme called, Smart Export Guarantee (SEG). You can only get SEG payments if you ask the right questions, use a suitably certified installer and apply to your energy provider yourself. The amount you get paid with SEG is generally lower than it was with the FIT scheme but, it varies depending on your tariff.
All solar panels have pretty much the same solar efficiency. There are a few brands that claim higher efficiency but the difference is less than 1% and the best ones command a premium price. When you see solar panels quoted with higher power output (e.g. 420W) this simply means they are larger. This does not make them better! There has been a general trend for solar panels to get larger in recent years, to the point where they are now difficult to manhandle.
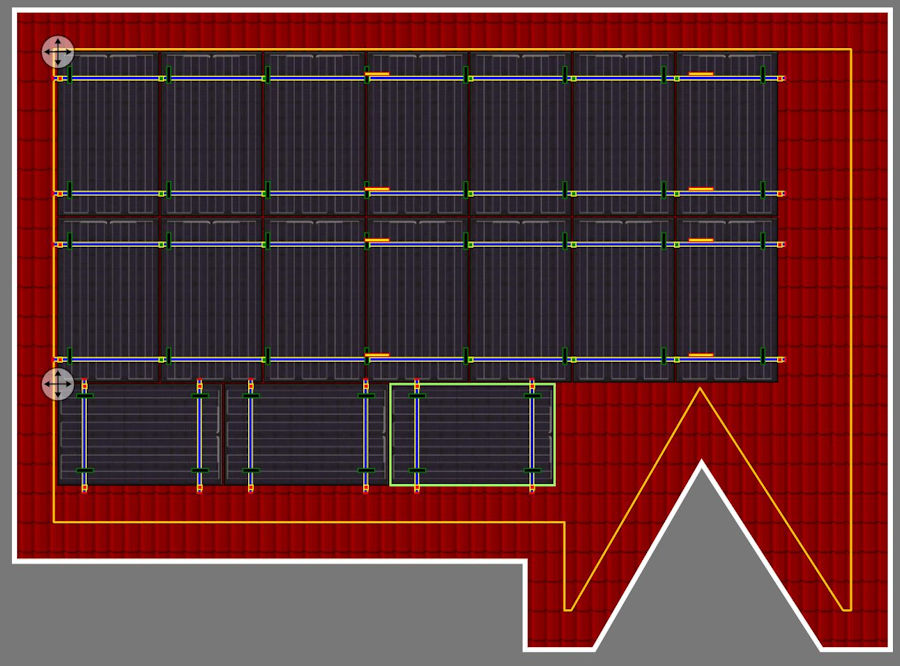
It is perfectly fine to mount solar panels in either landscape or portrait orientation, or a combination of both. It enables better coverage of the roof space and my own smart home solar installation project is a good example of this.
Location
Your location is a huge factor in how much energy solar panels will generate and this holds true within the UK too. It's a simple fact of geography that the western side of the UK has more cloud cover and is generally wetter. The South is also generally warmer and drier than the North. I live in Suffolk, one of the driest and sunniest counties in the UK.
Location in your local environment is important too. If you live in a valley, then the sun will hit your solar panels later in the morning and depart earlier in the evening. If you have trees to the South of your property, you will be in dappled shade at the start and end of each summer day and potentially all day in the winter months.
Roof Structure
A professional installer should physically inspect your roof inside and out. They do this to check the addition of solar panels won't overload the roof structure and to also check access for cables, etc. An older roof may also have issues with joist, membranes and tiles that need to be addressed. Be wary of installers that do 'remote surveys' using tools like Google Maps. To have good confidence in an estimate of the number of panels that can be installed on your roof space, the installer needs to accurately measure it and visually inspect it for things like roof vents, soil pipes, etc. This is even more important if the roof is complex, with multiple levels, dormer windows, etc.
When assessing how many solar panels can be fitted on a roof and in what orientation the panels will best fit, the installer should allow the required space from the edge of the roof and any ridge tiles (typically 400mm). There are also limits on how close the panels can be to guttering, boiler flues and soil pipes.
Orientation
In an ideal world, your solar panels would always be facing the sun to ensure maximum energy generation. In reality, your solar panels are mounted on a fixed roof and this faces in one direction all the time. The direction your roof is facing has a big impact on the amount of energy your solar panels will generate and in the UK, facing South is best.
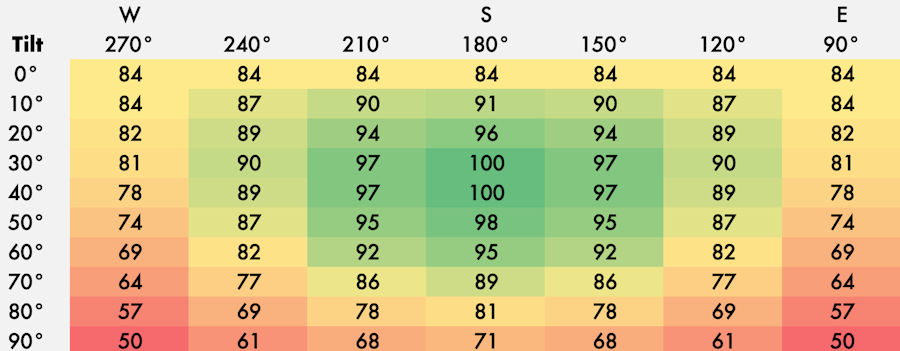
Solar panels can still work well on a roof that faces in a different direction, they just won't work quite as well. There are charts that show the impact of both roof direction and roof pitch.
Many people successfully install solar panels of a roof facing East or West, or sometimes both. Whilst the peak power levels are lower, East facing panels will generate more earlier in the day and West facing panels will generate more later in the day. A combination of both can work well together.
Although is may seem counter-intuitive, solar panels can also work on a North facing roof. The angle of the roof becomes much more important though. A shallower roof angle will generate a lot more energy and the closer you get to a flat roof, the better. This is an interesting article on the benefits and characteristics of North facing solar panels.
Roof Pitch
The angle (also called pitch or tilt) of your roof will have a big impact on how much energy is generated at different times of the year. The variation is due to the sun staying much lower in winter and getting much higher in the summer. You can find the best roof pitch for your location by using one of the numerous calculators online. My own solar generation is better than many in winter because my south facing roof has a 40° pitch. In the coldest months, the sun only gets about 16° above the horizon at its highest point.
Solar Electricity Handbook
This Solar Electricity Handbook calculator tells you the highest point the sun will reach, which will be when you reach your highest possible power output. The optimum angle for daily energy generation will be different to this though. For my location (Ipswich, Suffolk, UK) the roof angles for maximum power in each season are: Spring: 52°, Summer: 28°, Autumn: 52°, Winter: 76°. The roof angles for maximum power by month are: January: 68°, February: 60°, March: 52°, April: 44°, May: 54°, June: 36°, July: 28°, August: 44°, September: 52°, October: 60°, November: 68°, December: 76°
SolarSena
The SolarSena calculator claims to calculate the best angle for maximum energy generation over the whole year by location, which is 52 in my case. For monthly adjusted solar panels, the optimal tilt angles for maximum energy generation are: January: 73°, February: 65°, March: 54°, April: 42°, May: 33°, June: 29°, July: 30°, August: 38°, September: 49°, October: 61°, November: 71°, December: 75°
Shading
Shading on solar panels can be a big problem and shading can come in many forms:
- Total shade due to another building in close proximity or a feature of your own home.
- Dappled shade due to the sun passing through trees.
- Small areas of shade caused by a chimney or a pipe.
Shading is bad because of the way solar panels are manufactured as blocks of cells, which are then typically connected together in series (in a sequence). This means that one shaded panel can reduce the energy flow in the whole series of solar panels, affecting all of the panels connected together in that one 'string'.
In situations where solar panels are subject to shading, there are four options to improve things:
- Let the in-built 'blocking diodes' in each panel handle any shading. This can work quite well but there are no guarantees and it will depend on the panel construction.
- Group panels that have similar shading together and connect them as one 'string' into the inverter. This limits the impact of shading to only those that are affected.
- Fit optimisers to each panel that has a shading issue. This adds additional costs but, it can provide greater overall output and some brands provide individual panel monitoring.
- Use microinverters on all of your panels. This adds additional costs but also provides many other benefits.
Installation
Most solar panels are fitted to the roof using a system of frames or rails, which are attached to the roof joists. This results in panels that sit about 10cm proud of the roof. It means that some tiles are removed, modified and then refitted. Sometimes tiles are replaced. Solar panels can come in different colours but most are either dark grey or black.
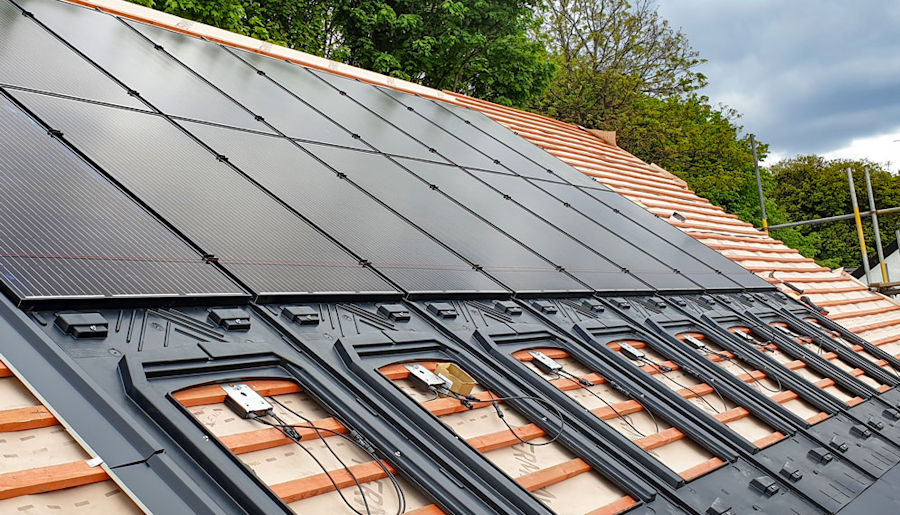
An alternative option to mounting frames is to use an 'in roof' system, where the panels are fitted in trays and sit flush to the existing tiles. This approach is generally more expensive but it does look tidier. Because there is less air flow under the panels, they get warmer on hotter days and the output of solar panels decreases slightly as they get hotter. This is not really an issue because you will be generating much more on these days anyway.
Solar panels can be mounted on a flat roof but this requires more specialist equipment, to ensure they tilt towards the sun and cannot be blown away in a strong wind. Typically, this requires weights or ballast to hold them down.
It is also possible to ground mount solar panels and this can sometimes require planning permission. It does give good access and also makes it easier to manually adjust the angle of the panels through the year, to increase the energy produced. They could also be mounted on an automated solar tracker to maximise the solar energy generated.
The roof mounting systems for solar panels have adjusters to ensure that all the panels sit level and flush with each other. A good installer will ensure that this is done and that the new panels have no marks, scratches or footprints on them!
Tile Types
The type of tiles on your roof will determine what fixing mechanism is used. I'm not going to cover all the different tile types here. Slate tiles are known to be problematic and require specialist fixings.
In all cases, the tiles should not be load bearing and should be refitted flush, with no raised edges. These will allow wind and moisture to run beneath the tiles. Additional gaps may encourage insects to enter the roof space.
Bird Proofing
The variation in quality of bird mesh installations and the materials used is quite frightening. Make sure you ask your installer to show you what they are installing and ask them how they intend to fix it. The materials should be robust and typically a stainless-steel mesh is used. Be wary of anything made of plastic as it will degrade when exposed to UV light. Do not let your installer screw into the solar panel frames, as this will void the panel warranty in most cases. The end result should look very tidy and not have anything looking bent, warped or loose.
Loft Temperatures
Where you have significant roof coverage with solar panels, you can expect the maximum temperatures seen in your loft to be lower. Since installing my own solar panels, the highest loft temperatures seen are about 10°C lower than they were before. This is because the 'double skin' effect, reduces the temperature of the roof tiles.
Distribution Network Operator
Your Distribution Network Operator (DNO) is the company that owns and operates the power lines and infrastructure that connect the national grid network to your property. You don't get to choose who your DNO is, it simply depends on where you live. You don't normally have any form of contact with your DNO. You can find out who your DNO is by completing this simple form (it just requires your postcode). In my case, my electricity network operator is UK Power Networks and my gas network operator is Cadent.
To be allowed to connect your home solar panels or battery storage to the UK power network, you will need approval from your Distribution Network Operator (DNO). There are basically two types of DNO approval for consumer solar installations:
- G98 is a simple connection procedure for 'fully type tested' systems under 16A per phase. These are installed and then the DNO is informed. If the solar installation is installed in compliance with G98, the DNO can be notified up to 28 days after the commissioning date. This is usually used with inverters rated up to 3.68kW.
- If you are installing a larger scale solar system (greater than 16A per phase or an inverter than can deliver more than 3.68kW), you will need to apply for G99 DNO approval prior to installation. This is because the DNO needs to determine whether your local power network infrastructure can handle the extra load. The process of the DNO reviewing your application can take up to 12 weeks.
Inverters
An inverter takes the direct current (dc) voltage from the solar panels and turns it into the 230V alternating current (ac) supply that you use in your home. Inverters typically have one or two inputs into which you can connect 'strings' of solar panels. There are a few that have three inputs. These inputs will have their own limitations in terms of minimum and maximum voltages allowed and this will dictate the minimum and maximum number of solar panels that can be connected to each input.
The peak output of your solar panels may be slightly higher than the output of the inverter and this is fairly common practice in the solar industry. This 'over sizing' (sometimes called the 'over sizing ratio') is the peak output of your solar panels divided by your inverter capacity. It should not exceed 130% but there are some exceptions to this 130% figure. For example, if you have solar panels both on an East facing and a West facing roof, they will be very unlikely to all produce their peak output power at the same time.
The reason for over sizing is that solar panels are the relatively cheap part of any installation and they are not often exposed to the ideal conditions required to hit their peak output, due to the angle of the incident sunlight on the panels, the roof inclination, the ambient temperature, shading, etc. In the winter, the panels will not get close to their peak output, due to the sun being so low in the sky. Having more peak power than the inverter(s) peak output rating, allows you to generate more energy, more of the time.
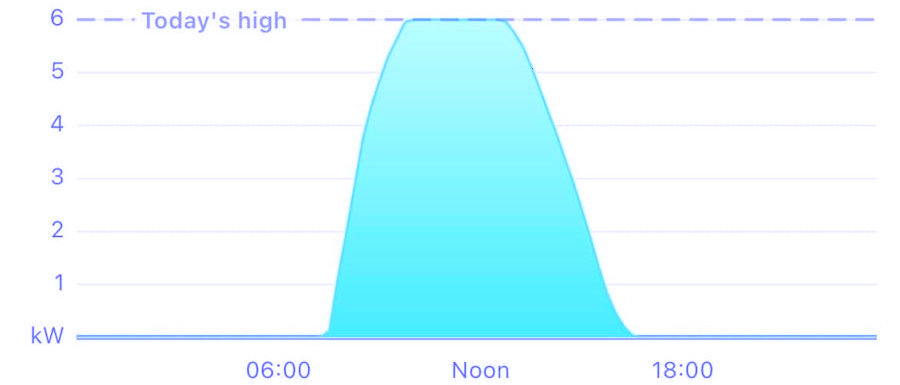
Ideally, you should avoid the impact of clipping as shown here, so that you have the highest possible peak power to use for many things (EV charging, appliances, etc.) and can potentially store it in a battery. It requires a careful balance though. Too much clipping and you have invested in solar panels, only to throw away some of what you are generating. Avoiding clipping completely will cost more though and will make your payback period slightly longer. As the customer, you have to make the decision and spend the money.
Hybrid Inverter
Inverters are not 100% efficient at converting dc voltages into ac voltages and all batteries are fundamentally dc. To minimise these conversion losses, some systems use a 'hybrid inverter'. These can use the power from the solar panels to deliver 230V ac and use any spare dc voltage to charge batteries at the same time.
Hybrid inverters are used a lot in 3.68kW form with G98 approval. It means you can have a higher solar panel peak output (e.g. 4.5kW). Whilst it can only convert 3.68kW to ac for use in your home or for export, it means any spare can be used to charge batteries.
A limitation of hybrid inverters is that they can only deliver the specified output power when using power from both the solar panels and a battery. This means that sizing a hybrid inverter is important because it can the limiting factor in utilising generated and stored power.
Microinverters
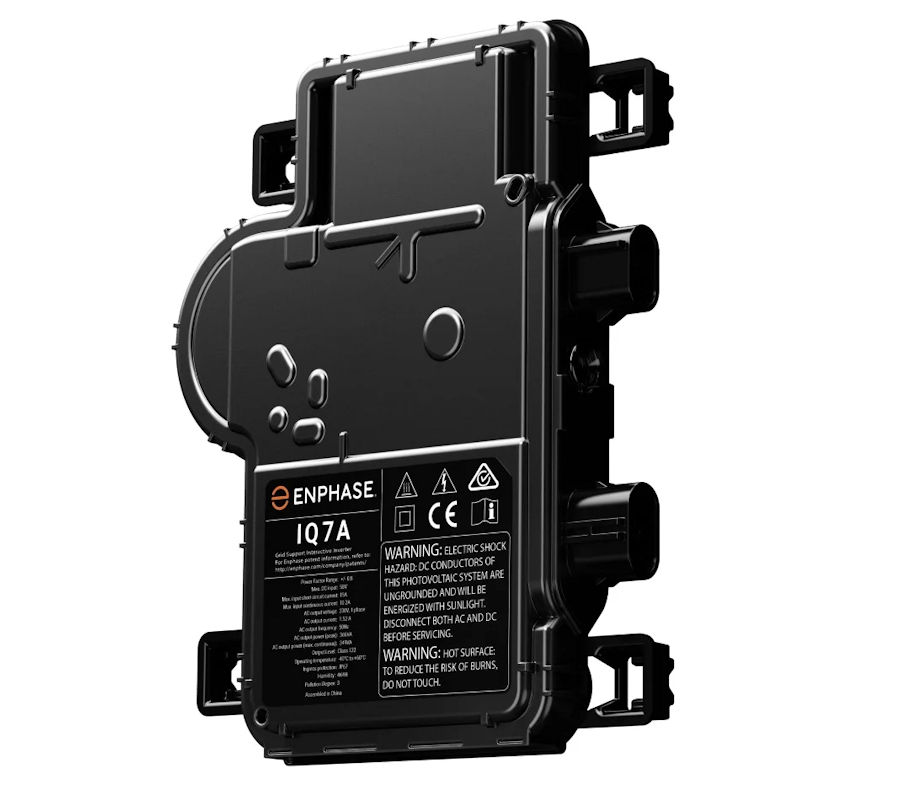
Microinverters fit to the underside of each solar panel and enable each one to generate a 230V ac voltage, rather than a dc voltage. This approach avoids shaded, damaged or failed panels having an impact on the rest of your generation capability, by allowing each panel to function and be monitored independently. It means they can provide the maximum power output under all conditions. This technology works really well where you have irregular shading or panels across more than one roof orientation.
The trend in recent years has been towards larger solar panels with higher output. The power output of microinverters has lagged slightly behind this trend and it is important that the two are well matched, to avoid 'over sizing' and clipping. My own smart home solar installation project is a good example as I have used Enphase IQ7A microinverters with a 349W peak output with 390W Trina solar panels. This represents an 'over sizing ratio' of 111%, which is acceptable. You may struggle to find microinverters that are a good match with higher power solar panels.
Installation
All inverters have specified operating conditions. The stated clearances and operating temperatures need to be adhered to. They can also be quite noisy, so bear this in mind when deciding where to install one. An inverter also uses power, even when in standby. Some can use 40 to 60W. Hybrid inverters need to be installed close to the battery.
Features
Some inverters have additional features such as the ability to divert energy to a hot water heater or other devices. If this is something you need, you must mention it to your installer because it may change the design and the equipment used.
Battery Storage
I'm only covering standard batteries that store electrical energy up to about 20kWh here. I'm currently researching other forms of energy storage though that will store 100s of kWh, including phase-change materials and hydrogen based solutions.
The main reasons for using battery storage are:
- To store excess generated energy during the day to use at night when you are not generating energy.
- To store excess generated energy during the day to handle transient peaks in demand during the day that are above your generating capacity.
These are simple substitution methods where you are replacing imported energy with stored energy. If this is all you ever did, then your Return On Investment (ROI) would still be much better than with no battery at all. There is more that can be done to improve your Return On Investment (ROI) though:
- To store energy at night (using cheap rate electricity) to avoid importing expensive energy during the day. This is effectively 'time shifting' your usage. If you battery is big enough, it can store enough energy to power your home all day, avoiding the need to use any peak-rate electricity at all.
- Use stored generated energy to export energy at peak-rate times and get paid much higher amounts for it. This assumes your DNO export limit is not exceeded.
AC Coupled Batteries
All batteries are fundamentally dc but some are packaged as an 'ac coupled' product. This means that the battery is not directly exposed and it comes enclosed in a package with an internal inverter and battery management system (BMS). It uses 230V ac to charge it up and it delivers 230V ac back into your home power network.
Whilst this means there are some inherent conversion losses present when both charging and discharging an ac coupled battery, it enables a lot more flexibility and control and much simpler integration into your home power network. It also means that the battery can work both alongside and independently from your solar inverter, increasing the total amount of power available. My Tesla Powerwall is a good example of an ac coupled battery. In addition to the 6kW of power that can be delivered by my solar panels and their Enphase microinverters, my Powerwall can deliver another 5kW, making 11kW in total.
It is much easier to upgrade and install more ac coupled batteries at a later date because they don't need to be 'balanced' and they work completely independently. In fact, many different brands and capacities of ac coupled batteries can be made to work together in harmony.
Capacity
How big a battery do you need? This is a difficult question to answer because it depends upon your specific needs. The simple answer is that you need a battery enough 'usable capacity' to run your home for a typical day + another 20% as a safety margin. This gives you flexibility without spending huge sums of money. After a bit more consideration though, you may want to have more storage capacity for the other things discussed in this article.
Usable Capacity
Many batteries have limitations on how low you can discharge them, to avoid damage to the battery cells. This is called the minimum Depth of Discharge (DoD) and may be as much as 20%. They may also have limitations on the maximum State of Charge (SoC) allowed, to stay within the warranty conditions. This could be stated as something like 90%.
When you combine these two figures together, you can lose as much as 30% of the headline capacity! What looked like a keenly priced 9kWh battery in the sales brochure may only have a usable capacity of 6.3kWh.
Not all manufacturers do this. One of the reasons I bought a Tesla Powerwall is because it has a usable capacity of 13.5kWh. The actual battery inside is over 15kWh and the interface lets you use from 0% to 100%.
Charge Rate
All batteries have a maximum charge rate and this will vary with temperature and current state of charge. A battery that is nearly full or a battery that it too hot or too cold will not charge as quickly. The charge rate can be a major limitation and it can mean that you waste excess energy in summer, because you are generating it faster than you can store it. In the winter it can mean that you can not fully charge your battery during the 4-hour cheap rate period that comes with some tariffs.
One advantage of ac coupled batteries is that they charge independently and the time required to charge several is the same as the time it takes to charge one.
Discharge Rate
All batteries also have a maximum discharge rate. It too can be a major limitation, with your battery unable to support the devices and appliances being used in your home. Battery discharge rate is really important if you want your whole home to run from the battery during a power outage.
Emergency Power Supply (EPS)
There are varying levels of EPS functionality:
- Automatic Sockets - A double 13A socket can be wired to your solar battery system as an EPS outlet, allowing the inverter to automatically disconnect from the grid to your socket in the event of a power cut. This can be used to power small loads.
- Automatic Circuits - An extra consumer unit and some wiring allow one or more circuits to be powered (typically lighting and a fridge). These circuits will become automatically powered after a short delay.
- Manual Whole House Backup - You can manually switch your whole house over to backup power (assuming it has the capacity). This is done by rerouting the incoming network connection and the consumer unit through the system.
- Automatic Whole House Backup - Power your entire home with or without a grid connection, using stored energy.
- Automatic Whole House Backup With Off-Grid Capability - Solar inverters need power to operate but this approach can also use stored energy and solar power to run your whole home. This is the solution I have installed using my Tesla Powerwall.
Monitoring & Control
You can have the best renewable energy technology in the world installed in your home but, it really isn't useful if you can't monitor how well it is working and cannot also easily control it to make it behave the way you want it to.
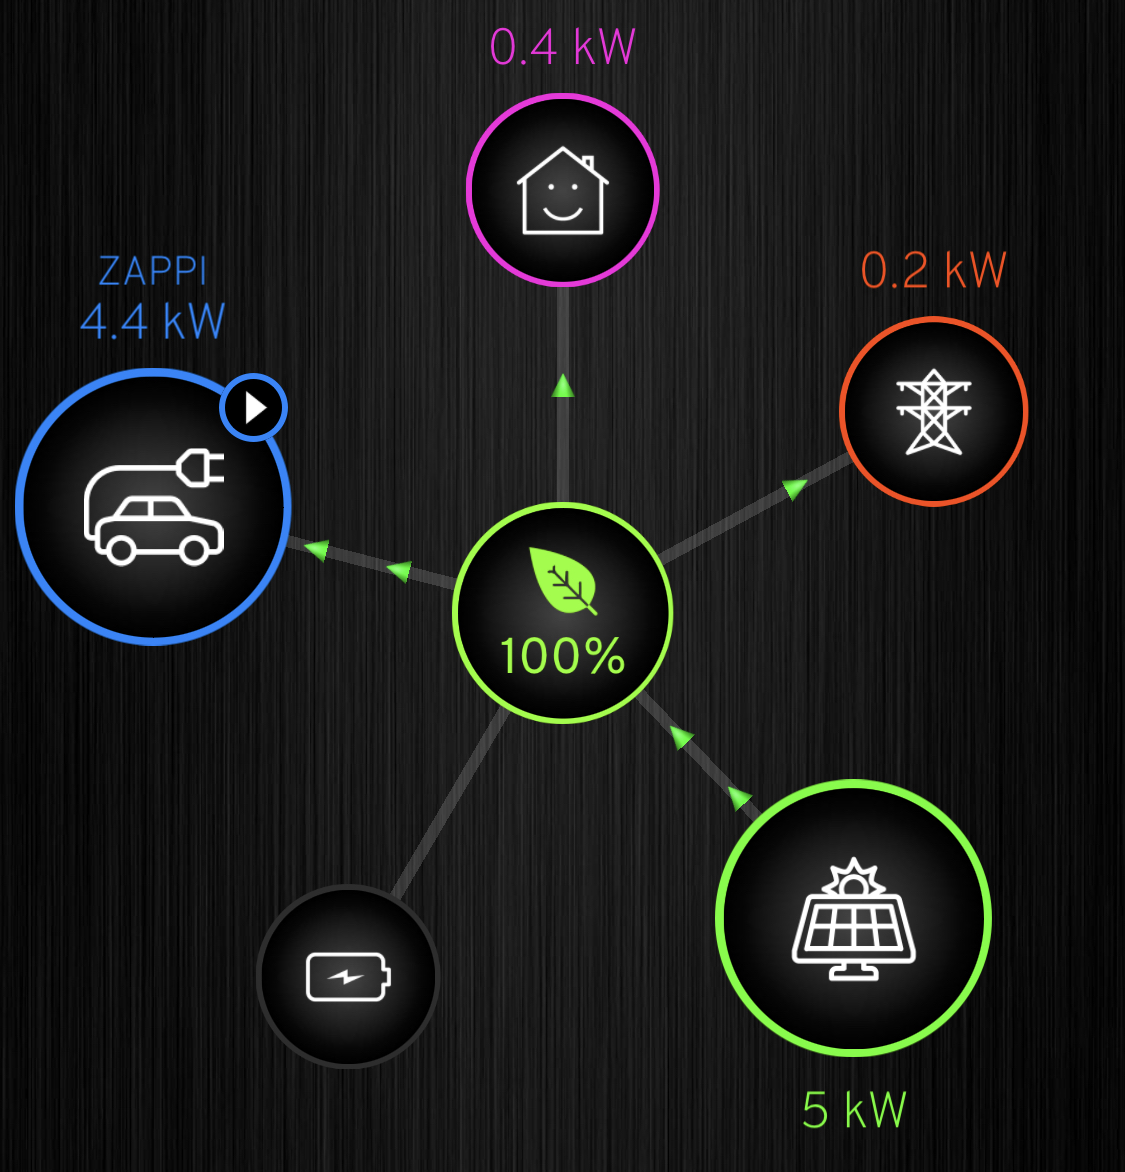
It is very easy to get obsessed with the numbers coming out of your solar installation and I'll be the first to admit I am 🤣 but, these numbers enable you to understand exactly how well your installation is working and to be able to quantify this. Only then can you be confident that you are getting a good Return On Investment (ROI) and the know that it is performing as expected.
It is really important that you know what tools, apps, cloud services, etc. come with your chosen installation and equipment. Most inverters are cloud connected these days or at least have an option to be so. I'm not going to go into this in a huge amount of detail because it varies with each manufacturer. If you want to see some examples, then read my reviews of my Enphase microinverters and my Zappi smart EV charger. I also regularly share examples on my blog.
Too Much Data?
I see a lot of questions on social media that are solar data related. Whilst data on how your solar installation is performing is really useful, it has to be taken in context. I see a lot of posts about energy flows not adding up and in 99% of these cases the numbers involved are really small. The current sensors used to measure energy flow (often referred to as 'CT clamps') in residential installations are not very accurate and even the best ones have an accuracy of around 1% (some are 3%). The resolution of the measurement technology is also not very good. Any measurement or variation less than 100W (0.1kW) should really be regarded as noise.
The other thing that many people fail to realise is that the apps they are using to view this data are usually talking to cloud services and APIs and these add a lot of latency. The 'snapshot' in time that is shown in the app may be many seconds or even several minutes out of date.
Energy Tariffs
Being on the right energy tariff at the right time is really important! I have written a dedicated tariff page.
Other Stuff
- I asked my home insurer about an impact of solar panels and battery storage and it was noted but, made no difference to them.
Any Questions?
If you have got this far and still have questions, please get in touch. I will try to answer them and update this article.
If you found this page useful you can buy me a coffee. This helps me maintain this website and add more content.
Related Reading
My Features
- Selecting a solar panel and/or battery installer
- Enphase Microinverters In My Solar Energy Project
- Improving Solar Energy Return On Investment
- How To Save Energy
My Projects
- Smart home energy modelling project
- Smart home energy management project
- Tesla Backup Gateway smart home integration project
- Smart home energy analysis
- AC current transformer sensor


