Smart Home Pond Project

From aged 4 years old, I have always had a pond in my garden. When we moved into our current home in 1995, one of the first things I did was build a pond in our garden. Ponds are relaxing and educational, for both adults and children. Our pond has goldfish which breed most years, many newts, dragon flies and much more wildlife in it. The birds love it too.

Like many UK gardens we used to have lots of frogs but, in recent years amphibian numbers have drastically declined across the whole of the UK :-( The last time we saw frogs in our garden and pond was in 2018. This new pond is designed to be more 'frog friendly' and I will try to re-introduce them to our garden when it is completed.
We currently have 16 goldfish in our pond but the number varies as they sometimes die or get eaten. Almost every year they breed and we have given some goldfish away to keep the numbers reasonable.

When our children were old enough to play in the garden, I had a removable metal pond cover fabricated, until they were old enough to understand the dangers. This very strong and it will easily take my weight. It can also be easily be removed by an adult when we are out in the garden. My 'children' are now adults, so it is mostly used to protect the goldfish from herons.
The new pond is designed to be the same diameter, so that I can reuse this cover on the new pond.
Objectives
The primary objective is simply to move the our existing pond, to make room for a new 'smart garden lounge' and hot tub. The other main objective is to improve our quality of life (as with all my smart home projects) and also improve things for the wildlife in our garden. With this pond I hope to encourage more wildlife and a more diverse set of wildlife into our garden. I also plan to make it 'smart' with some sensors and devices. The smart home infrastructure put in place is also being used to make our patio smart.
The Plan
We have some big plans for our garden, which means that our current pond is in the wrong place. So I have to create a new pond and fill in the old one, which will end up underneath a new "garden lounge". This gives me the opportunity to create a fully smart home connected pond and install new features, whilst also making it more wildlife friendly. The list of features so far looks like this:
- Water level sensor.
- Smart home controlled pump to automatically top up the pond from a storage tank filled by my rainwater harvesting system.
- Outside temperature sensor near pond.
- Temperature sensors to monitor the temperature at the bottom and the surface of the pond.
- Pond lighting. I'm currently looking at options but the most likely plan is 12V 'pucks' sitting on the 'shelf'.
- Water feature (fountain, etc.)
- Floating pond heater to maintain a hole in any ice during the colder months, under smart home control based on the various temperature sensors.
- Networked IP camera to observe wildlife close up and test some of my visual analytics algorithms. I'd like to do 'heron detection' and 'cat detection' :-)
Power

With mains power to the waterproof enclosure, an internal 12Vdc power supply (rated at 4A) will be used to power pumps and an Arduino.
New Pond Construction
My new pond has been designed to be a similar size and shape to the old one, so that I can reuse some of the existing paving slabs and my pond cover. The new pond is squared off at the rear though to provide more space for plants and a sloping ramp for wildlife to more easily enter and exit the pond. It will also feature an overflow that runs under the fence panel and into the the hedge on the other side.

Like my old pond, this new one will be made of shaped concrete and brick, with a pond liner. To start with, I've laid out the basic shape and levels. When fully dug out, this pond with be about 100cm deep at the central point. This is quite deep for a pond but, we have herons in our area and our fish need to be able to hide (even with a pond cover). Newts and water lilies also prefer deeper water.
You can just about see the top 25mm ducting (for network cables) running a long the back of the pond in this photo. I've installed another piece 20cm below this to carry a mains power cable.

I'm re-using old bricks to provide a solid 'wall', to support the paving slabs around most of the perimeter. In this photo, you can just see the edge of the current pond. It is not being moved far!

This photo shows the overflow and entry/exit slope for wildlife. Both are a good features to have in any pond design. There is a shelf all the way around the edge of the pond, which is about 20cm deep and used for pond plants in pots. The 'shelf' at the rear has some much larger pots with iris and other plants. The central part of the pond will be about 100cm deep. This ensures it will never freeze solid during cold winters.
All the sharp edges will be rounded off with an angle grinder and lined with protective material before the pond liner goes in.

Started to enlarge the central part of the pond and dig down. I still have quite a long way to go, about 40cm deeper, so that the water will be over 100cm deep in the middle. It's quite hard work as I've hit clay and stones.

Only 20cm deeper to go and the water will then be 1m deep in the middle. I also need to enlarge the hole a bit wider.

A quick check to ensure the pond cover fits :-)

And the digging is finished! :-) The water will be just over 100cm deep in the middle. I've also made the 'shelf' narrower by enlarging the central hole.

All the concrete work has been completed.

Installing the new pond liner went well. The only issue being that I had enough left over for another pond :-)

The pond is pretty much complete. The new composite fencing needs to be installed before I can do the final bits. The newly seeded lawn area has come up really well.

Installed the new composite fencing behind the pond. This is one of three wooden fence panels that has been replaced like this.
Smart Features

I'm using my Smartisant Arduino PRO1 PCB (V3) to connect various smart sensors and to provide the secure control and reporting functionality. This PCB is connected using a cheap Ethernet module. This is one of my smart home building blocks and it provides a huge amount of reusable functionality at a very low cost. It provides great performance and is incredibly reliable too. I can also populate the PCB with just the parts required for each project, so it is also very cost effective.

The enclosure I'm using is an IP rated ABS box, 32cm × 24cm × 13cm. It's quite big but 25mm plastic ducting for network and power run into it. It will be wall mounted (about 30cm above soil level) and also hidden behind a wooden cover, because it's not very pretty to look at.

I like to mount my Arduino bits on a removable Perspex sheet (3mm thick) as this makes it easy to remove them to do any software updates or work on the hardware inside. I'm keeping the mains bits over to the right hand side and the lower voltage and network bits over to the left.
Note that this is also work in progress. The great thing with these PCBs is that you only need to populate them with the parts required for each project.

Two 25mm conduit adaptors will be fixed on the underside of the enclosure, one for networking, the other for mains power. I've kept these more than 20cm apart under the ground and also where they come out of the ground.

I mounted the enclosure and sockets on to the wall, using rawl plugs and stainless-steel screws.

As I said before, the plastic box and sockets on the wall are not very attractive, so I built this wooden cover, which also protects them from the rain and sunlight. This is also strategically hidden behind a plant :-)
I've now replaced this with another one, made from the left over bits of composite decking and fencing.
Patio Sockets

Underneath the enclosure (between the two pieces of conduit) will be these weather-proof double sockets. These are in case I need to power anything on our patio, which is just to the right of this new pond. Both of these sockets will be under intelligent control by my contextual smart home, so that one can be used to control the floating water heater.
They have manual switches and are paired, so they can't be controlled individually but, they can be manually disabled individually if required. They are modelled as an Appliance called 'Patio Sockets' by my contextual smart home.
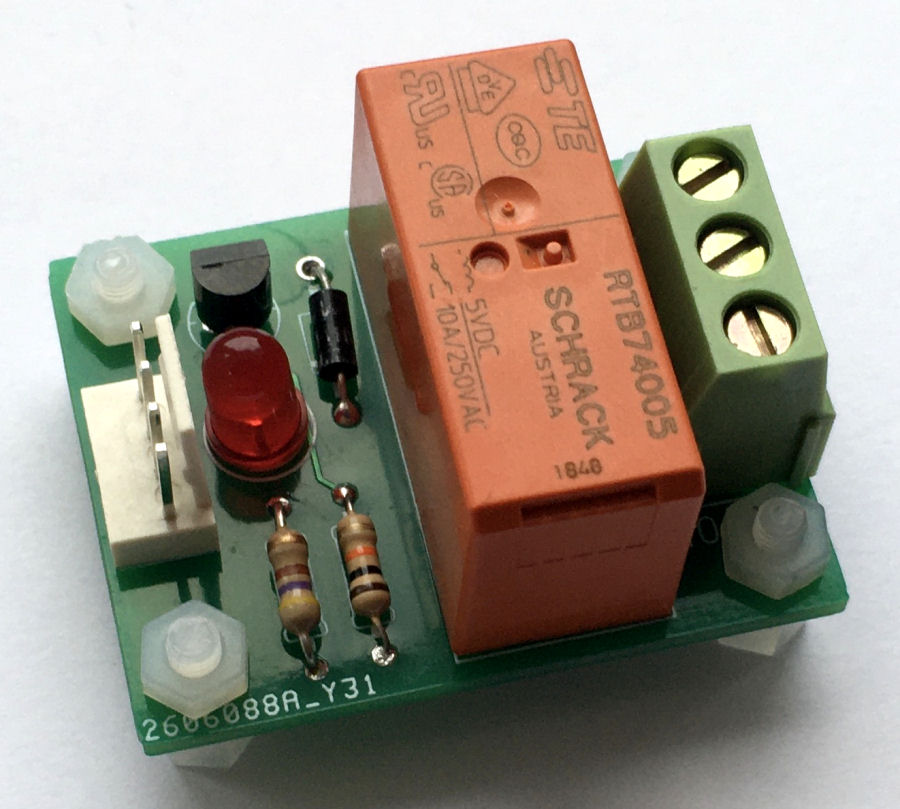
I'm using my 10A mains relay board to control the power, with a suitable in-line fuse. I don't plan to plug anything powerful into these sockets as I already have plenty of 13A sockets for garden tools in place.
Temperature Sensors

I'm using an encapsulated Dallas 1-Wire DS1820 temperature sensor to measure the ambient air temperature. This will stick out through a hole in the bottom of the enclosure.
This is modelled as 'Pond Air Temperature' and is used by a controller to intelligently control the 'Pond Heater'.

I'm using the same sensors to measure the 'Pond Surface Temperature' and the 'Pond Bottom Temperature'. These have been dipped in Hammerite several times to better protect them from the water. All the sensors are on plugs and run through ducting (installed as I build the pond), so they can easily be swapped out.
Pond Lights

The plan is to have a few underwater pond lights around the 'shelf' of the pond and under smart home control. I'm not looking for anything too bright or powerful. I got these 12V dc colour changing lights for Christmas and they are controlled by infra-red remote. The plan is to use the Arduino to provide an IR to IP bridge for these lights to allow smart control.

These are not true RGB/RGBW lights but use rings of red, blue and green LEDs to mimic proper colour changing lights. The 'Pond Lights' are modelled by my contextual smart home as smart lighting of type 'RGB'. This means they can be controlled by any of the NOT DEFINED supported by it, where NOT DEFINED allow.
The interfacing of these pond lights to my smart home is a seperate project. The biggest challenge I faced with these lights is that they float! To fix this, I have glued lead weights into the base and sealed them in with expoxy resin.
Water Level Sensor

To detect when the pond is not full, I'm using a custom version of my Smartisant Flood & Leak Sensor FLD1, with longer stainless-steel probes. This will be mounted under the overlap of the paving and out of sight, using a 3D printed mount that slots into a metal tube under the paving. The sensor will trigger when the water level is about 15mm below the full level.
These are resin encapsulated and waterproof.
These things have been designed to be super sensitive and work with very near pure water. They have also been designed to last 25+ years. They use an ac signal and capacitive detection, to avoid galvanic corrosion of the probes, which are also marine grade stainless-steel.

This is my design for the 3D printed sensor mount.
Pond Filler Valve

A 12V dc solenoid valve (normally closed) will be used to automatically top up the pond water level from my rainwater harvesting tank. The Arduino will report valve state changes to my contextual smart home. The valve will not operate if the tank level is low or if it is too cold. If the valve has been open for too long, my smart home will let me know too. During set up and testing, it is really easy to get my contextual smart home to send me a notification when the valve opens and closes.
The pond valve won't just close when the water level sensor detects the pond is not full, because it is set to activate when the level is 15mm below full. It will stay open on for longer (exact duration to be determined by testing), to ensure the pond is completely full.
Floating Pond Heater

I'm using a local temperature sensor and the Arduino to control a 150W floating pond heater, to keep the pond surface ice free during the winter.
The 'Pond Heater' is modelled as an appliance and is basically an alias of the 'Patio Sockets'. I use a controller to do the intelligent control.
In December 2022, the heater was on 9 times, for a total of 156 hours, costing less than £8 to run. It kept the surface ice free even with the temperatures down to -7°C and our fish like to congregate around the heater. In January 2023 it was on for 8 days and 100 hours.
Other Smart Features
With the Arduino installed for this project, it makes sense to use it for a number other smart features close by:
- I'll be using my Smartisant Soil Moisture Sensor SML1 to intelligently control some irrigation pumps.
- The patio lighting and some plant uplighters will be controlled using this Arduino too.
- It will also be used to control the bird bath pump.
Patio Motion Sensor

I'm using this wired, GJD external PIR sensor as it can be configured for each installation/application. It is not cheap but you need good quality PIR sensors to avoid false triggering. Wired sensors require no batteries and are much more responsive than battery powered, wireless sensors. This is just one source of occupancy information for the 'Patio' zone, which is within a 'Garden' zone.
Patio Beam Break Sensor

I'm using a beam break sensor across the front of my patio to create an enclosed zone. It effectively acts as a door contact sensor, to 'close' the Patio zone. This means we never get left in the dark on our patio.
Smart Home Integration
Over my many years doing smart home (I started in 2004), I have developed my own library of code for Arduino processors and this includes functions to integrate it into my distributed Home Control System and connect numerous types of sensors. These 'slave processors' can then do clever stuff like local control, self-monitoring of performance, local signal conditioning and rate limiting, send warnings and errors, or host some functions locally.
This maximises reuse across my many smart home projects, making it very quick and easy to develop and test new smart home capabilities. My smart home also employs the concepts of technology abstraction, meaning my smart home is also technology agnostic. This allows old technologies or broken sensors and devices to be swapped out with new ones, with minimal effort and zero reconfiguration.
Most of the Arduino processors installed in my smart home use an Ethernet IP network interface, to enable them to send and receive events with my Home Control System, using my unified communications protocol. Wired networks ensure very low latency and hence a great user experience, though occasionally I will use Wi-Fi.
Adding sensors and devices to my Home Control System is simply a matter of adding one line of JSON for each one, to the main configuration file. This defines the name, zone, object type and also the details of the slave processor it is hosted or controlled by. All the intelligence is within my Home Control System, which receives and sends encrypted events using my unified communications protocol. It sends events to update my smart home on things like the temperature, humidity, fan state, appliance and lighting state changes, occupancy, etc.
Ruled Out
- I already have an audio/music solution in place on my patio, so this is out of scope of this project.
- Some people use UV lights in their ponds to keep the water clear but, this can harmful to some wildlife. I've always left my pond natural in this respect and never had issues with water clarity. The water lilies help keep the water clear in the summer months.
Installation & Testing
Power
I've run 3-core armoured cable in 25mm ducting from the shed to the garden lounge enclosure. I've also run another cable from the garden lounge enclosure onwards to this pond/patio enclosure. At the shed end, I've installed a fuse faceplate (with 5A fuse) and an isolation switch.
Networking

I've run 4 Ethernet cables in ducting to my shed. I identified and labelled them, using a battery connected to two wires and a multimeter at the other end to detect the applied voltage. These are then connected into a wall-mounted 8-way patch panel.

All four cables run into the garden lounge enclosure but, two of them run onwards to the patio enclosure. In each enclosure, I'm terminating the Ethernet cables using a twin RJ45 faceplate.
It's well worth investing in a good punch-down tool. I then used a network cable test tool, to check the connections are good.
Summary

This project is very close to completion. The pond is now prepared for winter, with all sensors in place. The cover and pond heater are in place too.
Examples

My @smartest_home will occasionally tweet about the pond air temperature, which is used locally to control the pond heater.

My @smartest_home will occasionally tweet about the pond bottom water temperature.


