Smart Home Toothbrush
Whilst looking at the design of my bathroom smart mirror, I realised that the electric toothbrush charger in our bathroom (and those in other rooms) could be made much smarter and easier to use. Instead of trying to find somewhere to plug it in, I could permanently wire it and at the same time hide the wires and make the charging process simpler and more efficient for my family.
So my simple objectives with this project are to:
- Install the toothbrush charger in a much tidier and more aesthetically pleasing way by basically hiding all the wires.
- Make the charging experience simpler and more energy efficient. You simply put a toothbrush on the charger and let our contextual smart home decide how and when to charge it, resulting in a zero touch user experience.
- Turn the toothbrush charger into a sensor in its own right, providing occupancy information and context to our wider smart home. As my smart home uses a nested zone model, if the bathroom is occupied, then so must the 'upstairs' zone and also the 'house' zone. So the simple act of taking the toothbrush off the charger (or putting it on) can be an input into the many intelligent decisons our contextual smart home makes when controlling security cameras, heating, lighting, etc.
From this project I hope to learn much that can be applied to our next home.
Design

We use Braun electric toothbrushes in our house and these are recharged via a mains-powered charger. In most cases, I have cut the 2-pin shaver plug off and fitted a standard UK 3-pin plug. Typically these chargers use less than 1W but I still don't want to leave them on all the time.

The toothbrush just sits on the charger via induction and there are no indicators of what's happening. You don't know if it is on or off or even when the toothbrush is charged.
My plan is to use double-sided tape to invisibly fix the charger to my base.
My thinking is that when a toothbrush is placed on the charger, I will turn the charging on for 6 hours, to fully charge the toothbrush. If a toothbrush is left on longer, the charger will top it up by charging it for about an hour each day.
Toothbrush Proximity

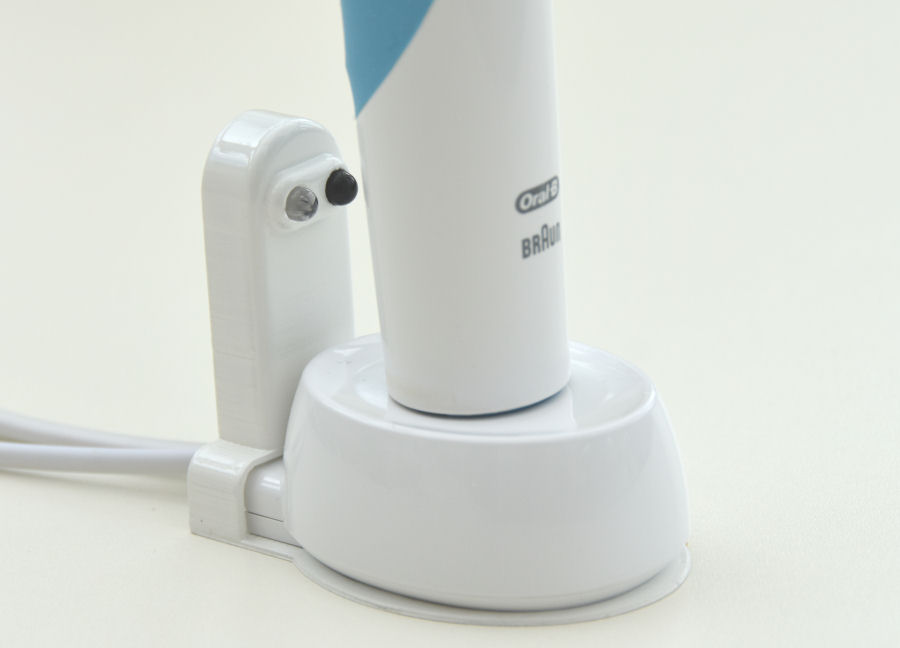
To detect if a toothbrush is actually on the charger, I am using an optical proximity sensor. This will sit inside a bespoke 3D printed stand for the charger, which will hide all the wiring.
This sensor uses a 5V dc supply and provides a digital output, so it uses 3 wires to connect it. The output is low, when the toothbrush is present.
3D Printed Toothbrush Stand

The toothbrush charger stand is designed using Autodesk Fusion 360. The base of the toothbrush charger is basically an oval, 46mm wide and 60mm deep. The charger sits on a plate of the same size and the cable exits at the rear. The optical proximity sensor is housed in an enclosure and sensor wires run out the back to an Arduino. The rear part of the enclosure will be resin encapsulated to protect it from moisture.
Build
3D Printed Stand

This is my first 3D printed stand. It's a low quality print, to check the dimensions before I commit to a final version. There are a few things I would like to change and improve on this design.
The base needs be narrower, the rear access slot needs to be a bit taller, the LEDs can actually be mounted lower and I think the LEDs would look better with a bezel around them.

This second version incorporates the required design changes and this will now be painted. These 3D prints typically take about 90 minutes to complete on my Ender 3 Pro 3D printer.
Arduino

My shower controller and many other parts of my contextual smart home are built using an Arduino Mega 2560, so I'm basically extending these existing projects to add this functionality. This is a slave processor and part of my contextual smart home. As part of my distributed smart home architecture, it handles a fair bit of functionality locally but it also talks to my Home Control System using my unified communications protocol and sends and receives events in this way.
Charge Power

Mains power to the charger is controlled by the Arduino using a solid state relay. These are incredibly easy to interface and keep the electronics well isolated from mains voltages.
Models
My contextual smart home models everything and this makes it really easy to add new project hardware like this. Everything connected also inherits all of my smart homes common capabilities.
The 'Toothbrush' is modelled as a 'Binary' sensor object that is either 'On' or 'Off'. A simple flag is set in a JSON configuration file to tell my smart home that this object provides occupancy information. So this means that when the sensor state changes the zone (room) in which is reside is temporarily occupied and this information goes into the wider pool of whole home context.
The 'Toothbrush Charger' is modelled as an 'Appliance'. Appliances also inherit many things from the models, including the ability to track power usage, monitor when they have finished, etc. In this instance though the appliance is simply 'On' or 'Off' and my contextual smart home sends encrypted events using my unified communications protocol to tell the Arduino to turn it on of off.
All of the clever charge timing is simple enabled by simply configuring a controller. This handles all of the complexities of doing really advanced and context-aware automation for me.
Summary & Learning

The toothbrush proximity sensor is working well and is very accurate and reliable. It is quite short range, so it is not triggered by anything else near the charger.
I did think about adding an LED to the 3D printed enclosure, to indicate when the toothbrush charger is on but, this would just be another annoying LED on (at night time) and the whole point of this project is to trust my smart home to intelligently charge my toothbrush. All activity will appear in my Home Control System logs of my Home Control System anyway.

In our next home, I'd like to build my smart charger fully integrated into the wall, like this ProofVision In-Wall Electric Toothbrush Charger.
We don't expect to save a huge amount of energy by implementing this project and that is not a primary objective. Chargers like this use very little power and many people leave them on and a toothbrush on them all the time. We are not using them in this way in our household though. Typically, the toothbrush is only placed on the charger when it needs charging and this is about every 8 to 9 days. In our main bathroom a single charger is shared by several people, so it makes more sense to control it intelligently.
Examples

This example tweet from our @smartest_home shows how it can track the toothbrush being placed on the smart charger. This will then start the intelligent charging process.

This example tweet from our @smartest_home shows how it can track the toothbrush being removed from the smart charger. This will then ensure the charger is not switched on.
Further Reading
- Smartisant research on smart toothbrushes.
- Smartisant research on smart mirrors.


